HOMEMADE BLACK GARLIC RECIPE
Homemade Black Garlic
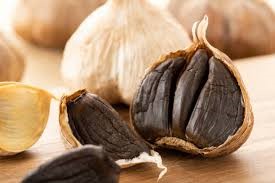
Black garlic is a testament to patience and anticipation. This versatile ingredient adds depth to a variety of dishes, offering a softer, molasses-like flavor that complements your culinary creations, including dessert!
Equipment
- 1 Rice Cooker
Ingredients
- 6-7 Whole locally grown garlic bulbs, unpeeled
Instructions
- Begin by preparing the garlic bulbs. Gently scrub off any dirt from the outer layers of the bulbs using a clean, dry cloth. Ensure not to remove the cloves from the bulbs or wet them, as this could disrupt the aging process.
- In your rice cooker, place the whole, unpeeled, and cleaned garlic bulbs. Arrange them in a single layer, root side down. If you're using multiple layers of garlic, remember to rotate the top and bottom bulbs every few days to ensure even heating.
- Set your rice cooker to the "warm" setting. This provides the ideal temperature and humidity for the aging process without cooking the garlic. For those with larger rice cookers, you can stack more bulbs, but maintain the rotation routine.
- Around a week into the aging process, check on the garlic for its progress. Since the time required can vary depending on your rice cooker's temperature and the quantity of garlic, it's recommended to do a taste test at this point.
- To perform the taste test, select a clove, peel it, and take a small bite. The desired outcome is black, with a sweet, tangy, and slightly chewy texture – reminiscent of a slightly softer gummy bear. The flavor should have a richness akin to balsamic glaze.
- Depending on your rice cooker's heat level, the aging process could take up to 3 weeks. Keep monitoring and testing until you achieve the desired texture and flavor.
- Once the garlic reaches the desired consistency and flavor profile, it's ready to enjoy. Store the bulbs in an airtight container in the refrigerator. Black garlic can be stored this way for up to 6 months. Peel the cloves as needed, or peel them all at once if you'd like to capture an appealing photo.
Notes
Embrace the potent aroma of garlic that will permeate your space during the process. If you’re not a fan of the lingering scent, consider placing the rice cooker in a ventilated area or a room where the odor can be contained.
If using multiple layers of garlic in the rice cooker, ensure even heating by rotating the bulbs from the top and bottom every few days.
BLACK GARLIC DESSERT: BUTTER TARTS

Butter Tarts with Black Garlic
Ingredients
Pastry
- 450 gram Lard
- 2 ml Salt
- 950 ml Flour, sifted
- 1 Egg, Separated
- 240 ml Lemonade
- Zest of lemon rind
Filling
- 180 ml Brown Sugar
- 240 ml Corn Syrup
- 2 Eggs
- 125 ml Unsalted butter, softened
- 5 ml vanilla extract
- Pinch of salt
Apples, Browned
- 15 ml Butter
- 15 ml Brown Sugar
- 1 ml Cinnamon
- 1 Granny Smith apple cored and sliced
Other Fillings and Garnish
- 36 Pecan halves
- 90 ml Raisins
- 4 cloves Black garlic sliced
- 115 grams Dark unsweetened bakers chocolate
Instructions
For Pastry
- Gently combine lard, salt and flour. Do not overwork.
- Beat egg yolk, add lemonade and lemon rind and whisk for a few seconds.
- Beat egg white until light and fluffy.
- Add yolk and lemonade mixture to the pastry, gently working it in.
- Add egg white and fold in.
- Form into ball. Cover and refrigerate for 1 hour.
For Filling
- While pastry is resting, combine brown sugar, corn syrup, eggs, butter, vanilla and salt in stainless steel bowl. Whisk until smooth. Set aside.
For Apples
- Melt butter with brown sugar and cinnamon in saucepan on low heat.
- Add apple and cook until slices are soft.
- Roll out pastry and put in tart shells or muffin pans to desired thickness (¼-inch).
- Put 3 pecan halves on walls of each tart.
- Add 1 apple slice, 3 raisins and 1 black garlic slice to each tart.
- Fill tarts with butter/corn syrup mixture to edge. Do not overfill.
- Bake at 375ºF (190ºC) approximately 30 minutes.
- Let cool. Remove tarts.
- Melt chocolate and then use to brush edges of tart. Drizzle remainder over tarts if desired. Serve.